Creating Custom Fonts
Fonts can be saved in different file formats: OTF, TTF and SVG (and some more).
With Inkscape, you can create SVG fonts.
These fonts are embedded in the resulting SVG file. For being able to use them in a text editor or graphics program, however, they must later be converted to another font file format.
You will not be able to use the SVG file directly as a font in a webpage, for instance. This is because SVG fonts have been removed from the official SVG standard. However, they are useful for font-making in Inkscape, and other font-making programs can still convert them to other font file formats.
The letters, numbers and special characters a font consists of are called glyphs.
To create a your custom SVG font:
Open the typography template with .
Open the Font Editor dialog from .
In the column labelled Font, click on New to create a font. You can double-click on the generic name, in this case font 1, of the font to change it.
Open the Layers dialog from .
Tip
You can also use the Layers dialog button in the commands bar.
Repeat the following for each glyph that you want to add to your font:
In the Layers dialog, add a new layer by clicking on the ‘+’ icon. Name it after your letter. Select the layer in the dialog.
Now, in the Font Editor, in the tab Glyphs, click on Add Glyph. Double-click on the Glyph name field to name your glyph, e.g. call it ‘Capital A’ or ‘Space’. In the Matching String field, enter the letter that it corresponds to.
Draw the path for your glyph on the canvas. It must be a closed, single path, which may consist of multiple subpaths.
When you’re happy with your glyph, select it, and also select the corresponding row in the dialog, then click on Get curves from selection.
Tip
You can always test your font by typing a text into the field at the bottom of the SVG Font Editor dialog and looking at the preview above it.
Hint
You can use the little ‘eye’ icons in the Layers dialog to hide the layers with the glyphs that you have already finished. To protect the completed glyph layers from accidental changes, use the ‘lock’ icons.
When you are done making the glyphs, save the file as an Inkscape SVG (this is Inkscape’s standard file format).
Although this functionality is meant for typographers, amateurs, too, can quickly get a working result and test their work as they continue.
When your font is finished, you can use a font-making software like FontForge where you import your SVG font and can export it into other different formats to be able to use it with other software, like Microsoft Word, LibreOffice, in any other program that supports the choice of fonts, or in a HTML file using CSS.
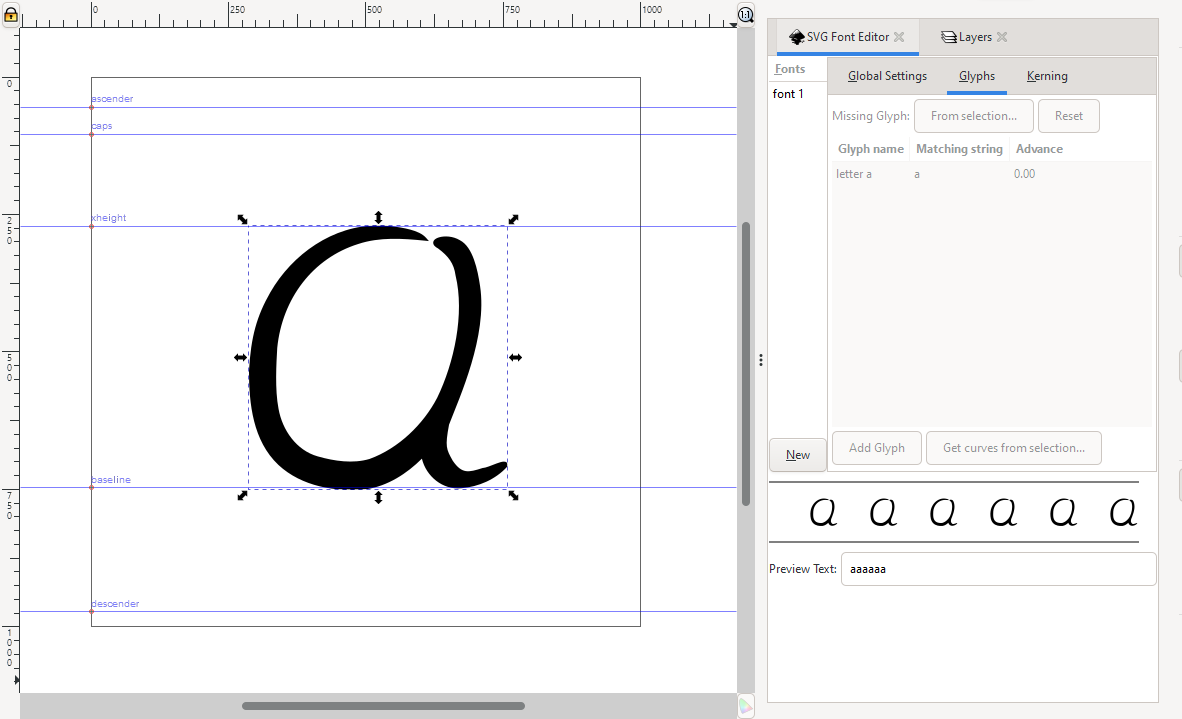
The typography template has just the right size for a single letter. It comes with 5 useful guides for making your font. On the right side, the (lowercase) letter ‘a’ has already been added to the SVG font.