The Selector Tool
 F1 or S
The Selector tool is a fundamental tool in the program, since almost everything must be selected before it can be edited.
Working much like a hand, the Selector tool also moves, scales, skews and rotates objects.
To move an object:
position the mouse over an object;
press the mouse button and hold, while dragging it to the desired position (hold Ctrl to move the shape in horizontal or vertical direction only);
release the mouse button.
Drag to move the selection. Transformations (such as moving, scaling, rotating) are easy thanks to the two-way arrows.
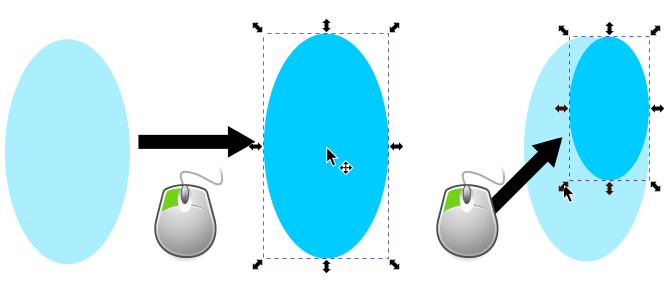
To scale (change the size of) an object:
click on it to select it;
position the mouse over a two-way arrow on a side or a corner;
press the mouse button and hold while dragging it to the desired size (hold Ctrl if you want to preserve the proportions);
release the mouse button.
To skew an object:
select it, then click it again;
position the mouse over a horizontal or vertical two-way arrow;
press the mouse button and hold, while dragging it to the desired amount of skew (also hold Ctrl for 15° steps)
release the mouse button.
To rotate an object:
select it, then click it again;
grab a curved two-way arrow in any corner;
drag it until the object reaches the desired angle (hold Ctrl for rotating in steps of 15°).
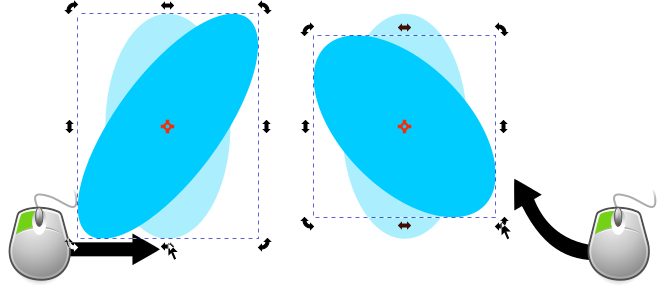
Click the selection a second time to access skew and rotating functions. The cross in the middle of the box is the rotation center. It can be moved.
In some cases, you want to edit more than one object at once. So the Select tool can select more than one object at once.
To select more than one object, there are mainly two ways:
click the first object, then hold Shift while clicking each additional object once;
or press the mouse button and drag out a rectangular selection box which encloses all the objects.

Each selected object is framed with a dashed line (known as the bounding box), while the two-way arrows for transformation are placed around the entire selection (one or more than one object).
You can combine the two methods: hold Shift to keep previously selected objects selected, and drag out a selection box to add more objects to the selection. Doing this the other way around works, too: after selecting more than one object by dragging a selection box, hold Shift while you individually click on more objects.
Also notice how the Shift key allows you to sort of toggle a selection: click to add to the selection, click again to remove.
Hint
By default, selecting with a box will only select those objects that were completely enclosed by it. Press the  fourth button on the tool controls bar to switch to selecting everything that was touched by the box, whether completely or partially.
A blend of these two methods is selection by touch. If you press Alt at any time while you are drawing a selection box, it will turn into a red path. Anything the path touches will be selected.
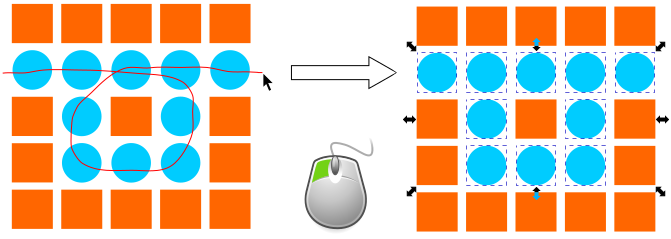
Selection by touch can be convenient, when the objects are too hard to select with a box and so numerous that clicking on them one by one takes a lot of time.
Caution
Make sure you don’t have anything selected yet, if you want to use selection by touch. Holding Alt will otherwise cause the objects to move along with the mouse cursor, even if you didn’t click on any of them.
Paste on top of selection
If you have copied an object to the clipboard, you can paste it directly on top of any other object you select. This can be helpful, if the spot you want to insert the object into is (partially) hidden below other objects in the drawing.
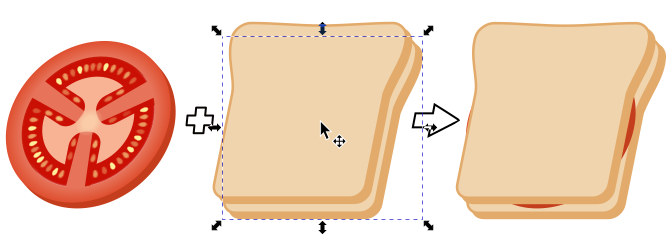
The lower sandwich slice is selected and the mouse pointer is hovering right in the center of it. Time to place the tomato slice.